In Visual Studio:

Configuration of the project
| Release Mode | x64 |
Installation of OpenCV
- Download the latest version of OpenCV from https://opencv.org/releases/ (Current: 4.5.2)
- Downloaded File : opencv-4.5.2-vc14_vc15 (Windows 10)
- Setup & Extract to C:\ (Depends on your location path)
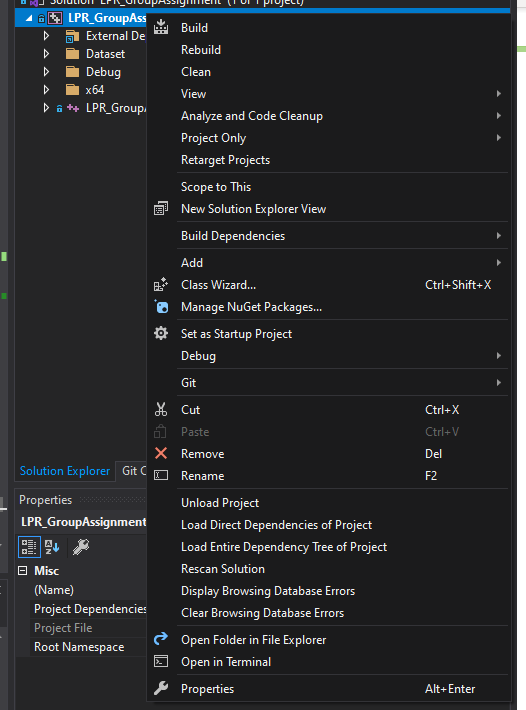
- Open your C++ project. Right click & select properties on your main project solution.
5. In Properties, make sure your configuration is same:

6. go to C/C++ > General > Additional Include Directories

Add:
| C:\opencv\build\include C:\opencv\build\include\opencv2 |
7. Linker > General > Additional Library Dependencies

Add:
| C:\opencv\build\x64\vc15\lib |
8. Linker > Input> Additional Dependencies
Add:
| opencv_world451.lib |
9. Click Apply
10. Now try add #include “opencv.hpp” to your code to start coding
Installation of VCPKG
- Go to https://github.com/microsoft/vcpkg
- For windows user, follow the Quick Start: Windows instruction.
- Press Window+R, type “cmd“.
- In command prompt, type “cd C:/“
- Then, type “git clone https://github.com/microsoft/vcpkg“
(Note: If your GIT is not installed (GIT != Github), please download and install https://git-scm.com/downloads)
or
if your GIT is not install,
you can download the zip file using this link
https://github.com/microsoft/vcpkg/archive/refs/heads/master.zip
Save and Extract to C:/ directory - After git clone is successful or extraction file is done, got back to the command prompt. Type “.\vcpkg\bootstrap-vcpkg.bat“
- Furthermore, type “.\vcpkg\vcpkg install tesseract:x64-windows“
- Wait for around 15-30 minutes for it to install depends on your computer speed.
- After all is install, type “.\vcpkg\vcpkg integrate install“
- Open your C++ project. Right click & select properties on your main project solution.
11. go to C/C++ > General > Additional Include Directories
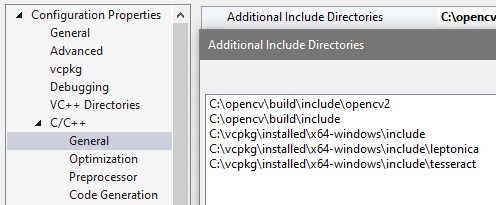
Add:
| C:\vcpkg\installed\x64-windows\include C:\vcpkg\installed\x64-windows\include\leptonica C:\vcpkg\installed\x64-windows\include\tesseract |
12. Linker > General > Additional Library Dependencies

Add:
| C:\vcpkg\installed\x64-windows\lib |
13. Linker > Input> Additional Dependencies

Add: opencv_world451.lib is already previously added. (can be excluded)
| opencv_world451.lib tesseract41.lib leptonica-1.80.0.lib archive.lib bz2.lib charset.lib gif.lib iconv.lib jpeg.lib libcrypto.lib libpng16.lib libssl.lib libwebpmux.lib libxml2.lib lz4.lib lzma.lib openjp2.lib tiff.lib tiffxx.lib turbojpeg.lib webp.lib webpdecoder.lib webpdemux.lib xxhash.lib zlib.lib zstd.lib |
14. In your code, add two header files
#include <baseapi.h>
#include <allheaders.h>
15. Add tesseract::TessBaseAPI* api = new tesseract::TessBaseAPI(); to your code main() to check whether the code is working properly.
Installation of Tesseract OCR
- Download the file from https://github.com/UB-Mannheim/tesseract/wiki
- Install tesseract-ocr-w64-setup-v5.0.0-alpha.20210506.exe
- Now you can use the code like
| if (api->Init(“C:\\Program Files\\Tesseract-OCR\\tessdata“, “eng”)) { fprintf(stderr, “Could not initialize tesseract.\n”); exit(1); } |